Â
|
|
|


SurClaro.com Home Page | Downloads | New files | Top files | ScreenShots | Reviews | News
Â
Users manual for Garmin GPS 295
For simulation purposes ONLY
By: Maxell
Â
Â
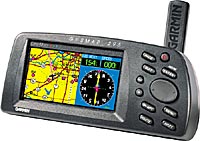 The Garmin GPSmap 295. One of the most popular GPS
hand held or flight yoke mounted GPS devices. An improvement device from the
GPSmap 190, which had a plasma screen with two colors, black and white. The
GPSmap 295 had a 4” 16 color LCD screen. With improved precision, +/- 3 meters
(9 feet). And a price improvement, $1100 retail.
The Garmin GPSmap 295. One of the most popular GPS
hand held or flight yoke mounted GPS devices. An improvement device from the
GPSmap 190, which had a plasma screen with two colors, black and white. The
GPSmap 295 had a 4” 16 color LCD screen. With improved precision, +/- 3 meters
(9 feet). And a price improvement, $1100 retail.
Â
Â
The famous Garmin GPS 295 has been
incorporated in Flight Simulator. Giving Flight Simulation enthusiasts help
with navigation, as well as essential information necessary to navigate through
difficult, and unfamiliar fields. There is no special documentation for usage
of this device, and there seem to be a rather large amount of people who need explanation
on programming the device for proper usage of all functions that are supplied.
Â

Â
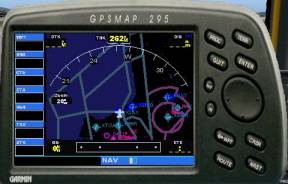
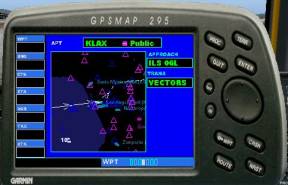
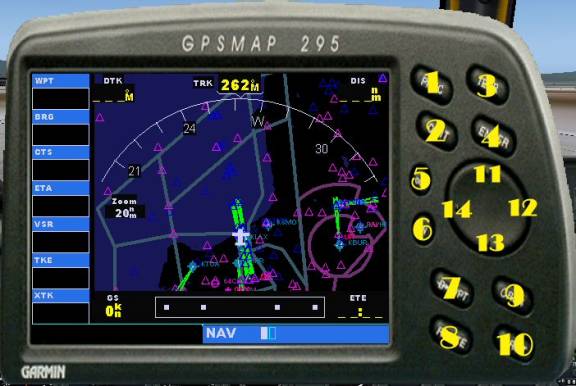
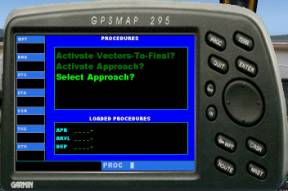
The diagram above
shows the menu system of the GPS 295. The navigation through the menus is
achieved with a function button, that has four directions, up, down, left and
right. As showed on the picture above, to navigate from the default navigation
page to the runway info page the “down” button needs to be pressed once, to get
to the information menu, and the “right” button once to access the RWY info
page.
Â
Â
Â
Explanations of all pages in the GPS 295 menu system
Â
|
 |
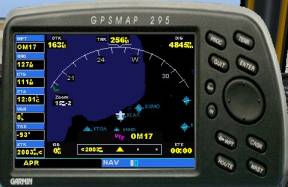
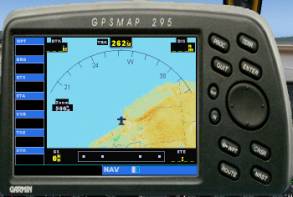
Main navigation page, the default page that appears when the GPS window is showed for the first time. It provides the following information: precise position of the aircraft, groundspeed, ETE, distance, DTK, real heading (sometimes may vary from the magnetic heading) and flight plan information. |
|
 |
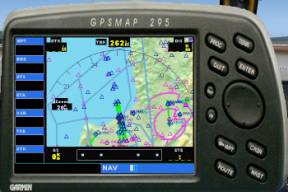
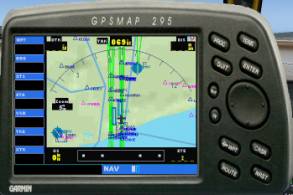
Map Page, giving the same information as the default navigation page, only in the “north is up” orientation. Very useful in visual flights when the distance, and position needs to be announced to the controller. |
|
  |
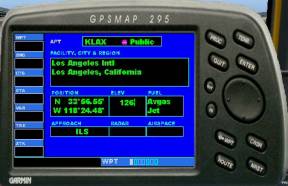
Airport information page is used for getting most basic information on the airport selected in the first text box. It has an advanced sorting system, so then pressed only (KLA) the system will display the first airport that resembles the partial ICAO given. The airport can be selected by name as well. The info given here is: ICAO code, Name, City, Region, Country, position, elevation, fuel services, approaches, airspaces…and many more |
|
 |
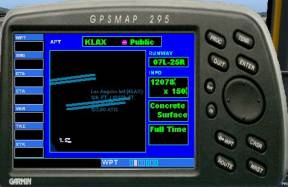
Runway information page is the second information page to the right. It gives the information about the runway(s) on the airport selected in the previous menu. The zoom, and un-zoom buttons can be used in this page to have a better view of the target runway. The target runway can be selected in the second box from the top labeled “runway”. To select a different runway the cursor button has to be pressed once to display the cursor, then the desired runway can be selected from a little popup menu, and finally press Enter to load the runway onto the display. This page also gives dimension of the runways, surface types and light information. Â |
|
 |
Frequency list page: vital information for navigating near airports and airports with ATIS, FSS Unicom and ILS services. The airport is chosen in a same way as in the rest of the menu (explained thoroughly later), and the list can be scrolled down and up with the “up” and “down” buttons, with the cursor turned on. |
|
 |
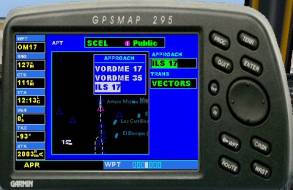
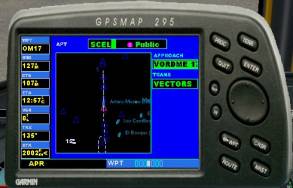
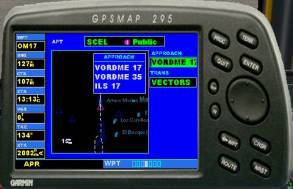
Approach Vectors Page the name says it all, pictures the vectors for the desired runway, and approach type. From the second box from the top, the runway can be selected by turning on the cursor, scrolling to the box, and pressing right once. After selecting the right runway, the valid transit route has to be selected, the same way as the runway is selected. |
|
 |
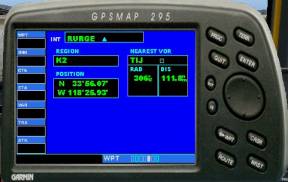
Intersection Information Page shows the intersection selected by it’s code in the top box. It gives information about the intersections along the route. The region, latitude, longitude and the nearest VOR, for a VOR-to-VOR routing. |
|
 |
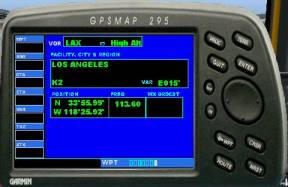
VOR information page gives the VOR information from the specific VOR code, similar to the ICAO code, only it can contain from 3 to 5 characters. The data given: type (high altitude or low altitude), Name of the VOR (Olympia, Seattle, LA… ) the airspace where the VOR is located, the position, frequency (NAV1) and the weather broadcast data. |
|
 |
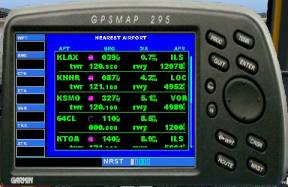
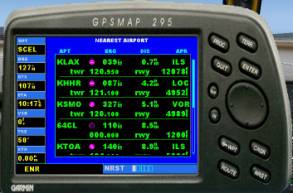
Nearest Airport List is a list of airports within ~100 miles from the present location. To scroll along the list, the cursor must be on, and the “up” and “down” buttons are used. Along with the ICAO code there is the tower frequency, active runway length, distance to the airport, and the approach type. |
|
 |
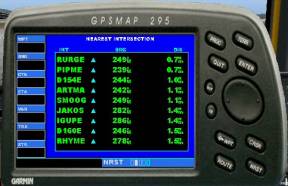
Nearest Intersection Page the name says it all. The list of intersections along the flight path, and around the airplane. The navigation trough this list is the same as the airport list. The data given here is: ITS code, fly to heading and distance. |
|
 |
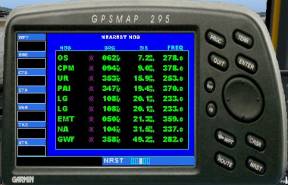
Nearest NDB page is a page of NDB’s near the plane. The navigation is the same as navigation trough the rest of the lists, up down and cursor. The pilot gets all info about a certain NDB, name or code, bearing, distance and the ADF frequency. |
|
 |
Nearest VOR page, a list of VOR’s near the aircraft. Information given: VOR name, bearing, distance and NAV1 frequency. |
|
 |
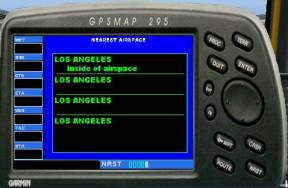
Nearest Airspace List is a list of airspaces around the airplane, shows only the airspace the airplane is. But can be useful when flying visual, as it replaces the old fashioned chart of the region. And certainly more flexible! |


Â
Mouse spots or buttons explanation:
Â
|
1. PROC button opens the transition procedure page. In that page the Approach can be selected from a list by selecting from a list of approaches. The activate approach function makes the selected approach activated as a part or the whole flight plan. The activate vectors-to-final makes another flight path from the present location of the aircraft to the final course to the desired runway for landing. The buttons used for navigation are: “up” and “down” for selecting the right function from the menu, button #4 ENTER, button #2 QUIT. Â |
|
|
2. QUIT button has multiple functions depending on the present page, and the way it is pressed. For example in any other menu besides the main NAV page after holding QUIT button for 2 seconds it will switch to the default NAV page. If you already are in the NAV page, after pressing QUIT once it will de clutter map, one press means no markers, two press means no ILS marks on the airport and intersections, and three times pressed it will remove anything but the big airports around the airplane. As it can be seen from the picture it is much easier to see the airports, ICAO codes and calculate the distances. Â |
|
|
3. TERR buttons enables graphical description of the terrain on the GPSmap. Very useful when flying small props as a bush pilot. Those planes fly at low MSL altitudes, and sometimes it is required to divert from the original flight plan to achieve the altitude needed to fly over some mountains. If flying a commercial jet it is not recommended to use this option as it may severely influence on frame rate. Â |
|
|
4. ENTER button is used for selecting the highlighted items. A simple OK button. Nothing more nothing less. |
 |
|
5. UNZOOM button (the name says it) is used to unzoom the default NAV page. The maximum range for the GPSmap 295 is 500 nautical miles. This button can also be used in runway info page, approach select and information pages. |
 |
|
6. ZOOM is the opposite from the #% button, used to zoom the page for better visibility. The minimal range the GPSmap 295 works with is 500 feet. This button can also be used in runway information page, approach select and information pages. |
 |
|
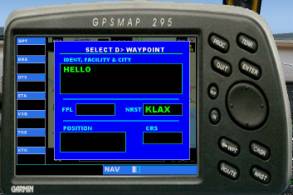
7. D>WPT is the button that opens the ditect-to waypoint adding. The code can be anything that has 5 characters. Letters and numbers. The keyboard is used to type in the code, which will be explained later. After entering a right code, which can also be the airport itself, the Activate? Question appears, and the ENTER button is used to avtivate the flight path. It also displays the nearest airport, position of the waypoint, and fly-to heading. Â |
 |
|
8. ROUTE button shows the flight plan aka the waypoint list from the departure point to the arrival point. This is not for editing the flight plan, just for viewing information. It shows the WPT code, fly-to heading, distance, and the total distance to the destination. This is mostly useful when having 3+ waypoints to always know the rest of the trip, and the estimated time of arrival to the destination. |
 |
|
9. CRSR button toggles the cursor in all GPSmap pages. It is one of the most important buttons on the device. |
 |
|
10. NRST button is another way of toggling the Nearest airport list, as well as the rest of the nearest lists using horizontal nav buttons (#12 & #14) |
 |
|
11, 12, 13 & 14 are the navigational buttons, and they can be explained as the left arrow on the keyboard #14 right arrow #12, SHIFT+TAB #11, and TAB #13 (these last two are a representation of the windows default previous textbox, and next textbox commands.) |
 |

Basic operations with GPSmap 295 note: to understand this part of
the document you first have to read and understand the explanation of all
buttons and pages.
Â
- Programming a “direct to” flight path: first locate the GPS window in your panel, and open the D> waypoint page (button #7). When the page loads press left cursor (button #14), and type using keyboard the code of the waypoint, press ENTER (button #4).Scroll down to the Activate? option, and press ENTER. Ex: To make a direct route to SCEL you have to open the page, press left button once, type SCEL, press ENTER. And scroll down to the Activate option, and press ENTER again to load it onto the main navigation page.
Â
- Using GPS for airport information: from the default NAV page press the “down” button once, to access the information submenu, and use the “left” and “right” buttons to navigate trough different pages for airport data, frequency data, and many more.
Â
- Programming the device for a non precision approach: the GPS can also be used as a nav-aid device for non precision approaches in low visibility. The GPS has a built in approach database, so it can make flight paths for various types of approaches and transitions trough the class B airspace. To set up an approach in your GPS you need to access your Procedure page, you will notice that the Select Approach option is flashing and you should press ENTER to select an approach from the approaches and transitions list. The next thing that is asked is weather you just wish to load it or activate it as the next waypoint of your flight path. If you are using GPS hold option in your autopilot the approach should only be loaded, not activated, because the autopilot will then divert from the desired path and proceed with an approach right away, before getting the approach clearance from the Center or the Tower. After getting the clearance the Activate Approach option will be available and it will put the approach flight path as the next active waypoint.
Â
If there are any questions or doubts with using the GPS in flight simulator I am a resident of SurClaro, Flight Simulation resources.
Â
Â
Â
Notice: This document is copyrighted, using any parts if this document
or the whole document is strictly forbidden without a permission issued by the
author.
Â
Copyright © Maxell 2004
Â
SurClaro.com Home Page | Downloads | New files | Top files | ScreenShots | Reviews | News
Â
Â