SurClaro.com Home Page | Downloads | New files | Top files | ScreenShots | Forums | Reviews | News
PART 1- Installing PAI flight plans
PART 2- Installing MRAI flight plans
PART 3– Installing custom flight plans
So here it is. A tutorial that will hopefully help those of you that need assistance with installing AI traffic in FS. This is just a basic guide, and by no means should it be taken as an endorsement of Microsoft or any add-ons developers. Use of this tutorial is at the user’s discretion and I will not be held responsible for any damage to software or hardware.
Whew! Now that the legal stuff is out of the way…what’s say we get to it huh?
AI traffic in FS gives us more realism. But with that comes a cost to performance. The more AI you have flying around, the more the CPU has to work and that takes away from the performance of the simulation. There is a balance, and you just have to find it either by setting the AI traffic percentage to an acceptable level, using AI models that are low in detail or LOD (Level of Display) counts or setting flight plan percentages to a lower level. Changing and modifying flight plans are a bit more involved and maybe I’ll do another tutorial on that later but for now, let’s go over the basic principle.
FS needs to know 4 things in order to make flight plans work.
So it’s really easy in a way. We have aircraft that we download and install into our FS\Aircraft folder. Then we download a flight plan package that contains all or part of the needs of FS. We tell FS which aircraft, airports and flight data to use and bingo! We are not the only ones on the ground or in the sky!! So read on and we’ll start off with the things you need before installing AI flight plans and then get into the ‘how-to’ methods. Confused? Don’t worry…so am I!
Installing PAI Flight Plans
First of all, you need TTools and AFCAD by Lee Swordy. TTools is for compiling/decompiling the flight plan files and AFCAD is for editing the gates/parking for FS Airports. I always find the latest version of TTools rather than using the version that comes with some installers from PAI or MRAI as it is the most up to date. There are different versions for FS2002 and 2004 so make sure you get the right one. I haven’t provided a link for them because they get upgraded all the time but you can find them at any major FS site like www.surclaro.com or www.avsim.com. Just get TTools for now so you can follow along with this tutorial and save it to disk but don’t extract it yet. Okay…got it? Good.
Next you need EditVoicepack. This is a program that finds new airlines/airport names and updates them automatically so FS can call your new airlines and planes by their callsigns and airports as well. It is available via searching the above sites. You can download it after we’re done with this tute so don’t worry about it as you don’t need it right now.
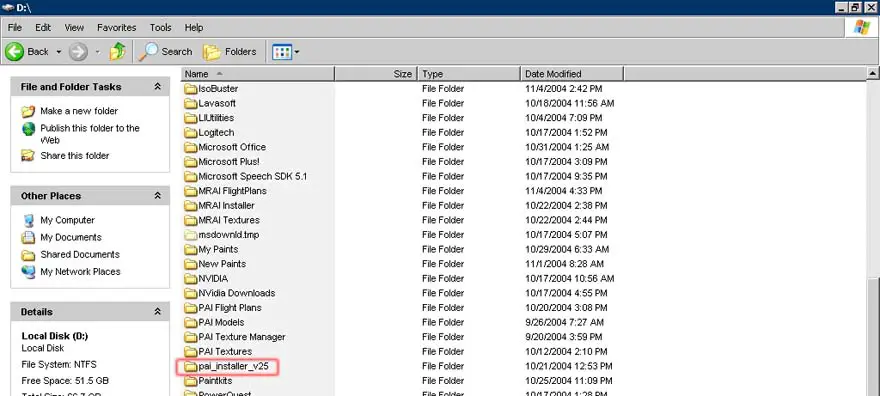
Now we are going to go to 2 of the biggest sites around for AI traffic flight plans. First is Project AI. Go to Project AI, click on ‘official files’ from the left menu, and download the ‘PAI installer and special packages’ program from the main menu. Extract it and save it to it’s own folder ( I put mine on “D” drive under the folder name ‘PAI Installer v25’ as shown below but you can put it wherever you want.
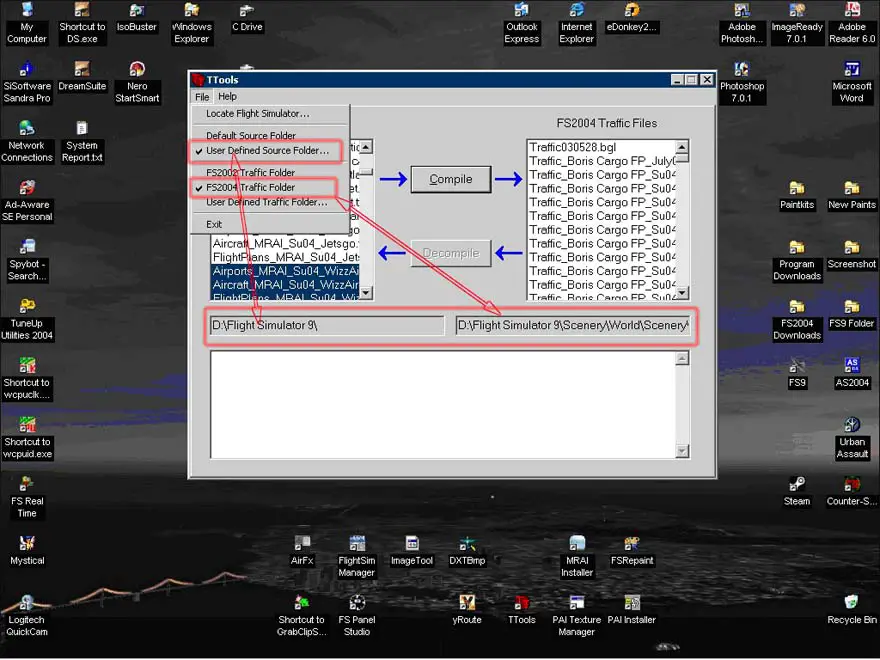
Next we are going to open up TTools and configure the program for specifying where our text files go, as well as our flight plans (bgl files). Extract/unzip TTools and install it into the PAI Installer folder. Click on TTools, then File, and set the source folder by clicking on user defined folder and browse to your main FS directory (e.g. C:\Flight Simulator 9\) and click okay. This is the folder where all the Aircraft, Airport and Flight plans text files will always be. Then check off the traffic folder to the following depending on which version of FS you have:
For FS 2002/Pro - C:\FS2002\SCENEDB\ATC\Scenery\ For FS 2004 - D:\Flight Simulator 9\Scenery\World\Scenery\
These folders are where all the Traffic.bgl files will go. FS2002 only has one bgl file called Traffic.bgl. FS2004 can have individual one’s for each airline you install so it’s easy to edit/remove/add rather than having one gi-normous file to edit as you can see in my Traffic files folder in the screenshot. FS2004’s default traffic file is Traffic030528.bgl. If you don’t want default traffic in FS then just delete this file, then go to your main FS folder and delete the Aircraft030528.txt and Flightplans030528.txt files. For FS2002/Pro, just delete the Traffic.bgl file, then the Aircraft.txt and Flightplans.txt files from the respective folders. PAI has an excellent installer/de-installer for default traffic if you want to use theirs. It’s on their site. This is how it should look:
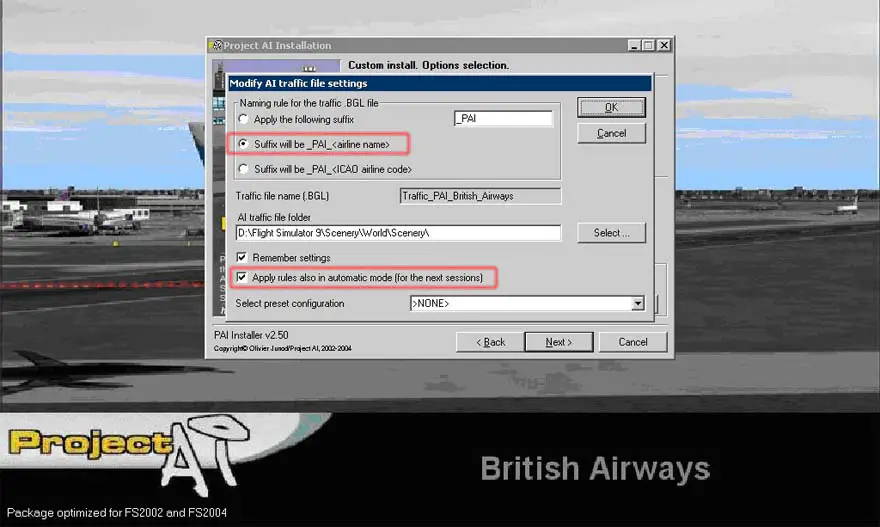
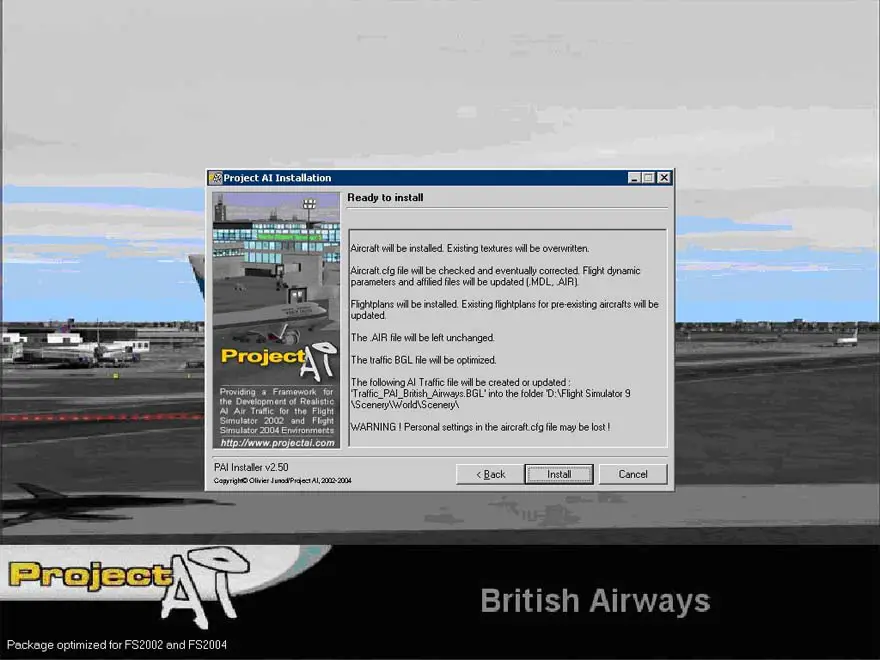
All my text files are on the left and are located in D:\Flight Simulator 9. All of my traffic files on the right are in the default location according to FS2004. You can’t put them anywhere else unless you want to copy/paste them somewhere for backup purposes. Okay? Good. Now we are going to download some flight plans and install them. click on ‘Official Files’ on the left, then click on Airlines on the main menu. Let’s go to a popular airline that we can all use and identify with…uhhhhh…click on British Airways down the page. I put mine in a separate folder called “PAI FlightPlans”. Open up the folder after downloading and unzip it. I just unzip it into PAI FlightPlans folder using the Windows XP generic unzip program. You can use WinZip, WinRar or something like that too. Now you should have 2 files, the original zipped file and another folder that is unzipped but has the same name. Then open up PAI Installer, navigate to your folder where you unzipped the BA (British Airways) flight plan, and select it. You will go through 3 or 4 menus telling you what it is going to install and where. Make sure you select the appropriate version of FS because that is important. Next screen will be asking you about some of the tweaks it allows while installing the plans. I leave everything as is except at the bottom where it asks for making aircraft ‘visible’ or invisible’ in FS. I make mine invisible because I don’t want to wait for it to load every plane and I don’t fly them anyways! The other part that is important is in the installation mode screen. There are 3 options for installing – automatic, custom and manual. For FS2004 users, click on Custom, go to the next page and then click on ‘suffix will be’ button. That way each plan you install will have its own unique name (FS2004 only). Make sure you click on all the other buttons as well shown below in the screenshot. You only have to do this once. Next time you install a plan…just use the ‘automatic’ option.
The next screen will inform you of all the changes that will be made:
The changes above are what we want to happen for our install. PAI installs the models, textures and does all of the changes for you to the necessary files but only for PAI aircraft and no other. The last part about the WARNING applies only to those of you who have changed your aircraft.cfg file for PAI aircraft only! For example, if you’ve manually changed your aircraft title or model parameters then PAI will overwrite them so you’ll have to go back in to re-edit them. After installing I always go back and open up TTools, and verify that I have these 4 files: Traffic_PAI_British Airways.bgl on the right Aircraft_PAI_British Airways.txt on the left Airports_PAI_ “ “ “ “ “ “ Flightplans_PAI “ “ “ “ “ “ . Just to be sure it all happened.
That’s it! Go to EGGL in FS and check out all the BA aircraft hanging around…
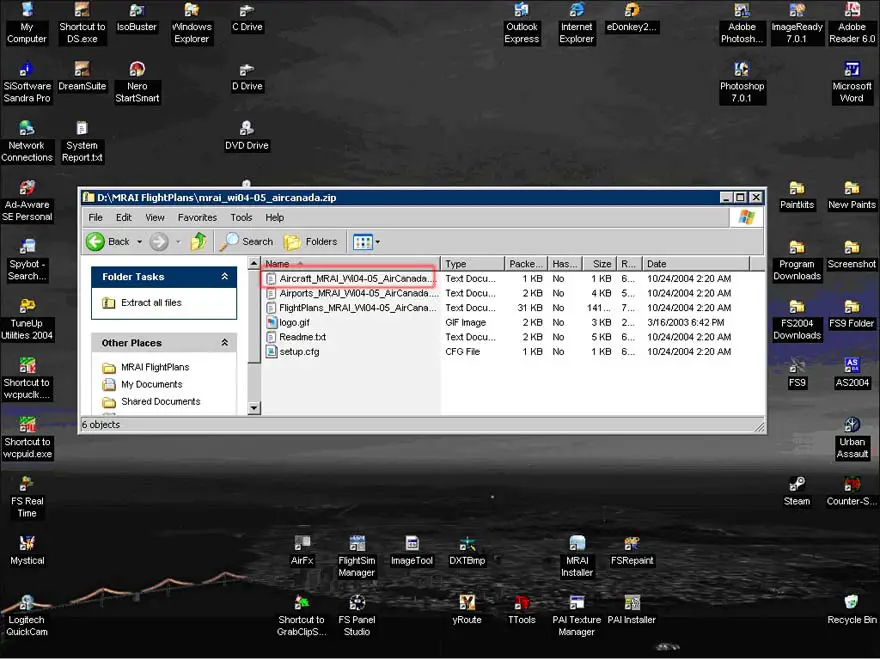
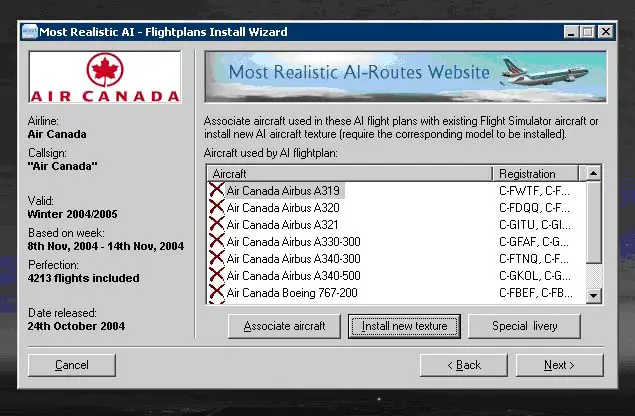
Installing MRAI Flight Plans Most Realistic AI (MRAI) is the second largest supplier of flight plans for FS. There is a catch though. They don’t supply the models and textures for their packages. There are some textures available but you still need to install the models. You have to find and install the models and textures yourself first, and then install their flight plans and associate the installed aircraft with them. Their plans are very realistic, and allow one to choose which model of AI aircraft to associate the plans with. You can do that with PAI as well…just requires some editing and modifications which we will cover in Part 3. The most popular ones out there are www.ai-aardvark.com, PAI models, and FSPainter models. A search on most FS sites or Google will provide you with the models and textures needed. MRAI’s website is www.mostrealisticai.com. You can download their installer as well from the links on the main page. Again, the same procedure as the PAI installer. Install to its own folder, and copy/paste TTools over as well into the same folder. Setup TTools again just like we did in Part 1 using the same folders. Download a flight plan…lets pick…Air Canada as it’s an easy one. Now go to the folder where you downloaded it and open it up (double-click). You should see this:
Now, we need to know which aircraft we need to download and install, and that is contained in the Aircraft_MRAI_WI04-5_AirCanada.txt file so open it up in Notepad and we see this:
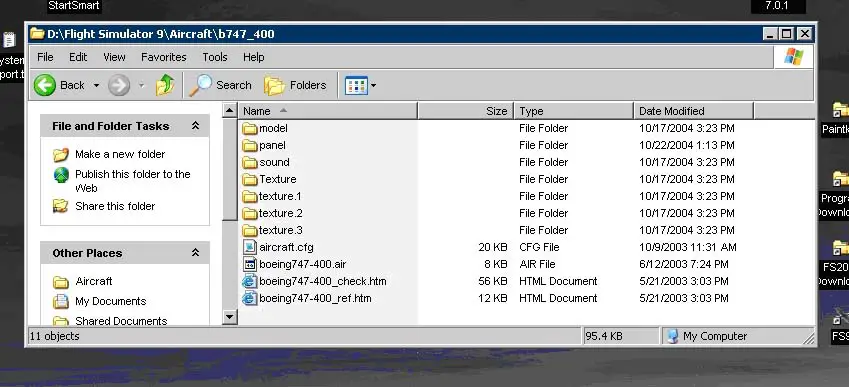
So now we know which aircraft we need to make this work. They are all Air Canada liveries (textures) so start searching for AI aircraft in Air Canada textures and install them in your FS 200*\Aircraft folders. Don’t forget now, you can download Aardvark, PAI, FSPainter or any AI aircraft you like with Air Canada textures to go along with them so pick and choose at will! I install aircraft in this manner… Downloaded the AC Airbus A319 to my FS9 Downloads folder. Unzipped it into a new folder within the same directory. Open it up and take a look at what the folder structure is like. Sometimes you’ll get a folder structure where it takes a couple of clicks to get to the main folder…so keep clicking until you get to this stage: (ignore the title on the top)
Here we can see the folders for the model,panel,sound etc. Now click the Back icon ONCE. Select the name of the folder that is showing and copy it over to your FS****\Aircraft folder. That’s it. I don’t use the MOVE function or CUT and COPY. I find this method most reliable. If you see other folders in the main folder shown above that are named “Effects” or “Gauges” then open them up and copy the contents over to your MAIN FS2***\Effects or Gauges folder respectively, only overwriting files that are NEWER than what you have already installed. All these extra folders mean is that the developer of the aircraft is using custom FX or gauges over the stock FS ones and you need them in order to use the aircraft to its fullest capability. Generally speaking, AI aircraft don’t come with the folders ‘panel, sound, gauges or effects’ but I put that in just in case they do. Now all you need to do is go into MRAI Installer, select the MRAI Air Canada zip file (MRAI Installer can use zipped files so you don’t need to extract them unlike PAI) that we downloaded and click next.
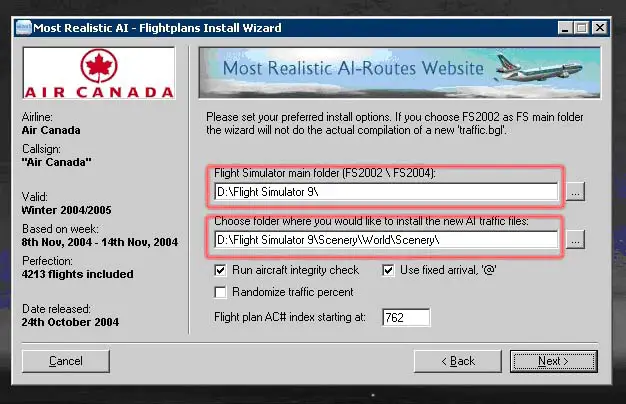
Again, we have to configure the Installer to tell it where our FS folders are. Notice it’s the same folders as the PAI installer? Whenever you install AI flight plans, the locations for source and bgl files will always be these folders. Hit Next. Now it will scan your aircraft folder to look for the aircraft it needs to associate the flight plans to. If you are like me, you might get an error or many errors regarding aircraft.cfg files that are incorrect. You need to fix these errors before continuing so that means shut it all down, and then go back and fix the problems. The next screen will be the one that displays all the aircraft it needs for the flight plan.
All you have to do is click on the appropriate model, then click ‘associate aircraft’ and the next screen pops up asking you which model/texture of the Airbus A319 you want to use out of the ones you’ve installed. Remember; pick only AI aircraft unless you got a smoking computer that can handle real models as AI! Keep doing the same for the other models. You can use the same model if you don’t have all of the aircraft installed as long as it’s compatible with the flight plan i.e. you can’t associate a Cessna for a 737. Not as far as I know. Well, maybe you could but be prepared for TTools to give you lots of errors during compiling of the flight plan!
That’s it!! Now you know how to install models and textures with packaged flight plans. Congratulations!!!
Installing Custom Flight Plans
So you should have a basic grasp of the procedures for installing AI flight plans. Let’s take a look at some other things we can do.
Say you downloaded a flight plan from one of the many great sites like Surclaro or Avsim. All it has is the flightplan.txt file. The plan is for ‘Zip Air’. Okay, easy enough. We find Zip Air AI aircraft and install them into FS. Now we need to tell the flight plan which aircraft we want to use. So, we need to make our own Aircraft.txt file. Lets start with the FS2002 procedure first.
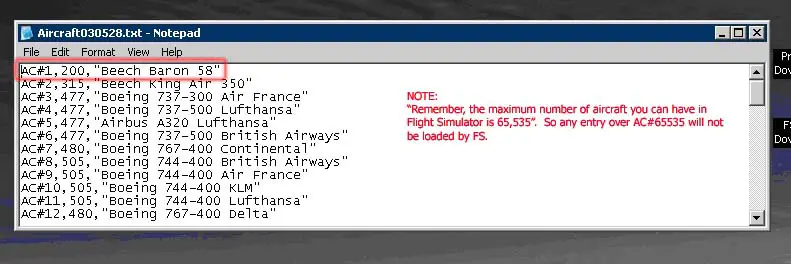
Go to your main FS folder and open up Aircraft.txt with Notepad. You’ll see entries like this:
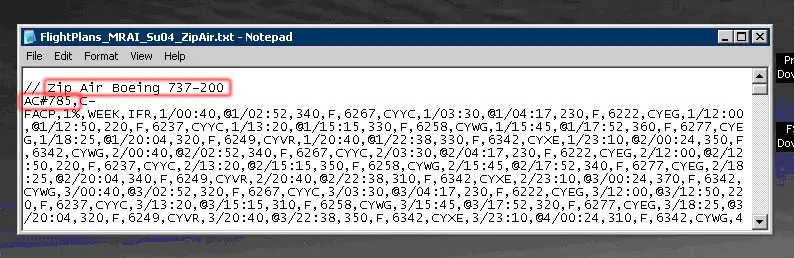
Pay no attention to the filename at the top. I’m just using an example. Now open up the Zip flight plan we downloaded with Notepad. Copy down all of the AC#’s that are in the plan. Example:
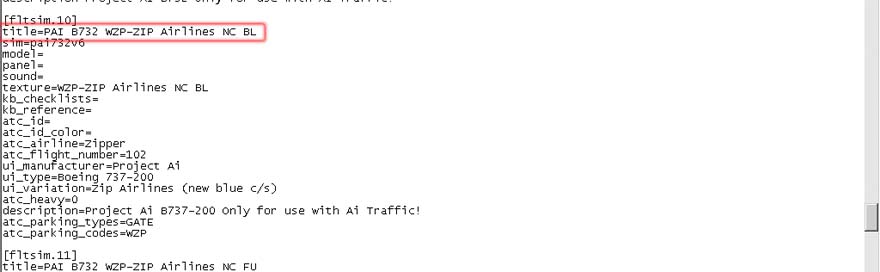
This plan comes with the aircraft already pre-numbered ( AC#785…). Keep looking for any entry that begins with AC#...and make a note of them all as well as the type of aircraft associated with it. So in this case above I would write down: AC#785- B737-200. If there was AC#790 then I will write down AC#790-Airbus A319. Just so I know what ac# defines the model of the plane. Now we open up the aircraft.txt file from above. See if there is an entry for any of the AC#’s that match from the flightplans text file. If there are, we have to change the flight plan file’s AC numbers because FS2002 has already assigned those numbers to existing flightplans and won’t allow duplicate numbers. Easy, go to the flightplan.txt file, click EDIT then REPLACE. In the ‘find what’ we put AC#785. In the ‘replace with’ we put in a new number for the aircraft…but which one? In our Aircraft.txt file we see a whole list of aircraft with numbers and descriptions. Pick a part where there is a gap between sequential numbers. If there is enough numbers there to insert your aircraft for the Zip flight plan then make a note of the starting number and the ending number. So, say there was a gap from AC#9239 to AC#9299 in your Aircraft.txt file. That means we can insert (hold on, gotta get a calculator) 60 new aircraft into this part. You don’t have to find a huge spot with openings in numbers, it just makes it easier to see all airlines with sequential numbers. Well, Zip air flight plan only flies 737-200’s and there are 4 or 5 liveries total so that is easy. We only need 4 or 5 slots to number. We go back to our Flightplan.txt, click EDIT then REPLACE and input ‘find what’ with AC#785 and replace with AC#9240 as that is the next space available. Hit okay and it changes it all! Do this for each different AC# in the flightplan.txt file. Save the flightplan.txt file now. Okay, so now our flight plan knows which aircraft to use and FS knows which aircraft to assign to it. But it doesn’t know which model/texture to use. Why? Here’s the trick…the entry in the Aircraft.txt file that goes AC#1,200,”Beech Baron 58” defines which aircraft to use. Our entry can only read AC#9240 so far. Where do we get that other information from? The aircraft.cfg file of the aircraft we want to use! So…open up your Zip plane’s aircraft.cfg from where you installed it in your aircrafts folder. Screenshot below is just an example entry:
Wherever it says ‘title’…that is what we need to put after the entry AC#9240. So for example. We’ll use AC#9240, 470,” PAI B732 WZP-ZIP Airlines NC BL”. What the hell??? How did you get all that? Here’s the breakdown: AC#9240 (the number available in the flightplans.txt in your FS folder) 470 – (The cruising speed of the aircraft found in the aircraft.cfg file under section titled ‘reference speeds’)
PAI B732 WZP-ZIP Airlines NC BL – (the title of the aircraft which is unique and identifies the model and texture. We get this info from the aircraft.cfg file of the aircraft we want to associate it to in the flight plan) Simple right? PAI and MRAI do this for us, but without them we have to do it ourselves. There are other programs out there that can help us like YRoute (available at www.spacejock.com/yRoute.html ). But this is the basic principle behind installing ai aircraft. The aircraft.cfg file tells us the name of the aircraft and its cruising speed we want to use, the aircraft.txt file tells us which aircraft is assigned to what number to use in a flight plan, and the flightplan.txt tells us which aircraft and airport to use for wherever the flight is planned for. All goes hand in hand. The only difference for FS2004 is that we don’t have to worry about looking for duplicate numbers in the aircraft.txt file because we can make a separate file for each flight plan! So, say we have a flight plan for Air Canada. Just open it up, make a note of the AC#’s it’s using, pick your Air Canada aircraft from your FS directory and make a new aircraft.txt file getting the info from the aircraft.cfg file and putting them in whatever numbered sequence you want. Here’s what I would do. Open up Notepad, create a new file and name it Aircraft_Air_Canada.txt. Now enter in the data: AC#1,250,”Boeing 747 AC Paint 1” AC#2,250,”Boeing 747 AC Paint 2” … AC#32,210,”Boeing 707 AC”. We know where we got all that data from right? Right. So now we save it.
The next step is compiling the files so we get our bgl file ready for FS to use. This procedure applies to both FS2002 and FS2004. Once we get the flightplans.txt and aircraft.txt files done we need one more file. The airports.txt file. I just use the stock airports.txt file for the compile. I know it’s huge in size but unless I get an airports.txt file with a flight plan, there’s a lot of work to do to find all the airports that the flight plan flies to into a custom airports.txt file. You can copy the contents of the airports.txt file into a new one and rename it to whatever you wish. So my airports.txt file would be Airports_Air_Canada.txt. In FS2002, you don’t do that. Just use the stock airports.txt file. Open up TTools. Select the new flight plans, aircraft and airports text files you just made. The 3 files will now be compiled to make one bgl file. So, select them, and then click compile. TTools goes to work. If all is good, you will see a new bgl file on the right! It’s all good! If you get any errors, TTools will show where the errors are and you need to go back and fix them before it will allow you to compile it. I know, it’s a tedious process but it has to be done!
That’s it! You’ve done it!! Boot up FS and see if you can find the planes!
That is the whole process. You can change anything you want as long as TTools doesn’t find an error. Installed PAI models and want to replace them with the Aardvark ones? No prob. Just make note of the ‘titles’ in the aircraft.cfg files of the Aardvark planes, change the titles in the appropriate aircraft.txt file and away you go! The AC#’s are already there, both in the Aircraft and Flightplans.txt files, we just need to change our aircraft. Those titles are unique, no two can be alike. Downloaded some new textures for an airline previously installed and want to trade the current livery with the new one? No prob. Just change the ‘titles’ again from the aircraft.cfg files of the new livery over to the aircraft.txt files and away you go. Remember, each time you change anything in any of the 3 text files (aircraft,airport,and flightplans) you have to re-compile it in TTools. If you don’t, your changes won’t be implemented.
If you get stuck, don’t worry. The worst thing that can happen is that your new flight plan won’t work and you won’t see the new planes anywhere. FS won’t become corrupted unless you actually delete the bgl files or text files previously installed and I can’t imagine anyone doing that!
Now get Editvoicepack so FS can use all the new airlines you’ve installed. To further the experience, you can get AFCAD to increase parking and traffic-flow at your airports to take advantage of the increased traffic. Simple programs really, with a great help file and tons of info on various forums around the web.
That’s it. Hope this tutorial helps. I’d like to thank MS for making a
great simulation program! Lee Swordy for TTools and AFCAD! Spacejock for the
great program YRoute and all the other developers and design artists that
make the simulation even better! Thanks to Rana Hossain (Developer of Flight Sim Manager for FS) for the advice and input, Max for the HTML conversion, Lortiawhak and Left Flyer for beta testing it and the gang at Surclaro.com. A very special thanks to Rick Tobin for helping me out and setting me off on this never-ending path of AI-land!!! Yeah, thanks a lot man!
Exx
|


SurClaro.com Home Page | Downloads | New files | Top files | ScreenShots | Forums | Reviews | News